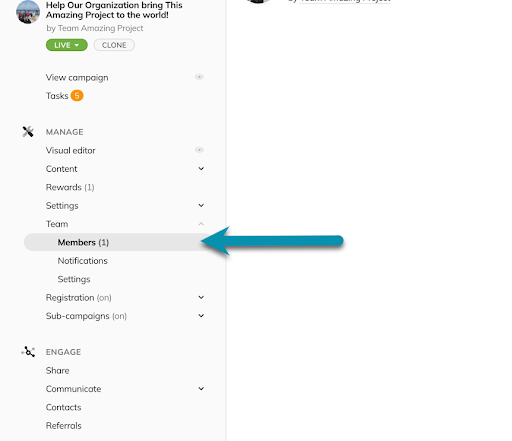
Add campaign team members, delete, and manage permissions and change team settings from the Team menu in your campaign sidebar.
Note: This is for Campaign teams only; click here to view how to add and manage Organizational team members.
Team members can join via invite or request to be part of your campaign team. In this guide, we will cover:
- How to add team members.
- Team member roles and their restrictions.
- Editing team settings (such as team name and picture)
- Managing team notifications
- Team member privacy
- Removing Team members
Part 1: How to invite team members #
STEP 1 – Click ‘Team’ in the sidebar menu of your campaign.

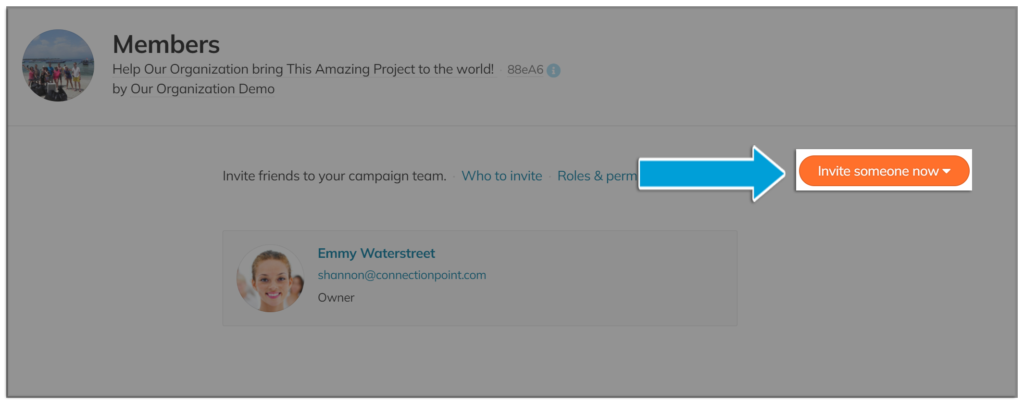
STEP 2 – Click ‘Invite someone now.’

STEP 3 – A new dialogue will open; enter the details of the person/people you’d like to invite, assign a role, then click ‘Invite.’
The new team member will receive an email notifying them of this invitation. There is a deadline for this; they have about a week to accept. You can send them reminders during this time, too (see below). If they’ve missed the invite, send them a sad face emoticon, then you can resend the invitation from this same menu.
Note: Invitees will first be required to create a ConnectionPoint user ID and password before joining your campaign.
Part 2: Team member roles and their restrictions. #
Role Permissions Comparison Chart

Role descriptions
- Owner – Owners have full control of the campaign. They can edit the campaign, post updates, access transaction and financial information, and invite/remove team members. They are also the only person who can request changes to any locked portions of a campaign.
- Manager – Managers have full onscreen control of the campaign. They can do anything the campaign owner can do, including edit the campaign, post updates, access transaction and financial information, and invite/remove team members. They cannot request changes to the locked portions of a campaign or withdraw funds.
- Editor – Editors have full access to the campaign for story editing, adding/removing picture and video, post updates and invite team members. But they do NOT have access to transaction details, nor can they request changes to locked portions of the campaign.
- Promoter – Promoters can import their own contacts and post their own campaign updates. They cannot edit the campaign nor access funds or private financial information, or invite/remove team members.
- Member – Members can import their own contacts and promote the campaign. They cannot edit the campaign, post updates, or access funds or private financial information.
Part 3: Editing team settings #
The default settings for teams (on standard campaigns) are NOT to show things such as team name and picture. You can change this, however, if you’d like to showcase the people behind the team. Perhaps you’re a specific division of an organization, co-collaborators working together on a project, or simply like-minded people hoping to raise funds for a cause. Think up a creative name, choose a team picture, and let the world know the people behind the campaign.
STEP 1 – In the ‘Teams’ menu, click ‘Settings.’
STEP 2 – Toggle Team Features to ‘On.’
STEP 3 – Select options to change.
Team name/picture
Select the name and picture you’d like, then click ‘Apply’:
Results tracking
Do you want to know which team member influenced which donations on the campaign? Turn this on, then choose whether you’d like the team members to be listed alphabetically (List) or by the amounts raised (Leaderboard). List & leaderboard and Leaderboard & list will allow both options; which one you choose is the order in which they appear.
For example, if you choose ‘List & leaderboard,’ the list will be the default option, with the leaderboard available to toggle between. Vice versa for ‘Leaderboard & list.’
Join the team (available for Multi-tiered campaigns only)
Creates links that will appear either on the campaign (Public) or via a link in your ‘Team members’ menu (Private).
Team member goal
This creates a suggested goal for your team members if you wish to set one. This does NOT make the goal mandatory; see our guide on Multi-tier campaigns for this feature. Don’t forget to hit ‘Apply.’
NOTE: This is the one menu where you do NOT have to ‘Save’ your changes; however, if a field has an ‘Apply’ button, that must be clicked to have changes take effect.
Part 4: Managing team notifications #
STEP 1 – Select’ Notifications’ in the campaign’s ‘Team’ menu.
STEP 2 – Click the notifications the team member wants to receive. A blue check means you will receive it, and no check means you will not.
Part 5: Team member privacy #
You can hide members of the team from appearing to the public. Handy if you want someone to help manage the campaign, but they don’t need/want their name viewable by the public.
Each member will have the ‘Hide’ option in the’ Team’ menu. Click this option, and the member’s box will appear cross-hatched. Click ‘Show’ to return them to public-facing.
Before:
After:
Part 6: Remove Team members #
In the ‘Team’ menu, you can remove team members with the ‘X’ button in their panel:
Then confirm:
Sorry, Brad. No hard feelings.